
Using Disk2vhd to convert Physical computers to Virtual machines
Disk2vhd is a free Microsoft tool that creates a virtual hard disk file from a physical computer.
Implementing virtual servers are a common every-day method to explore the virtualization benefits such as cost reduction, flexibility, automation, and so on.
In this article, we will see the steps taken to convert a physical server into a virtual machine.
Disk2vhd is not bundled with Windows, it has to be downloaded from Microsoft via the following link:
http://technet.microsoft.com/en-us/sysinternals/ee656415
Note: The minimal operating system for desktop conversions is Windows XP SP2 and for a Windows server is Windows Server 2003.
In order to convert physical computers to virtual machines, carry out the following steps:
- Download and extract the
Disk2vhdtool to a temporary folder on the computer you want to convert. - Double click on the
disk2vhd.exefile and click on Yes if you receive a message from User Account Control. Click on OK on the EULA page. - After opening Disk2vhd, select the path in which you want to save the virtual hard drive in VHD File Name, as shown in the following screenshot:
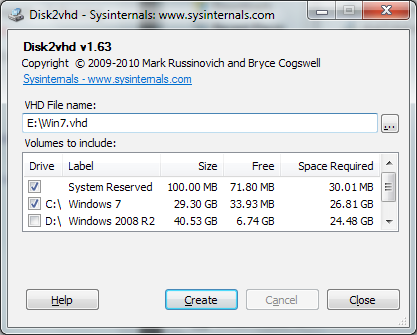
- Under Volumes to Include, select the volumes you want to convert and click on Create.
- Disk2vhd will start to convert the online system, without the need for a shutdown or restart. The time to complete this is based on the disk performance and the volume size you selected.
- After the conversion, copy the output vhd file to the Hyper-V server you want to import the virtual machine to.
- In Hyper-V, create a virtual machine with the configuration you want and under Connect Virtual Hard Disk, select the VHD file created from the previous steps.
- After you've finished creating the virtual machine using the converted virtual hard disk, start it through the Hyper-V console. Note: To prevent name and IP conflicts, make sure the old physical computer is powered off or not connected on the same network as the new virtual machine.
- Start the converted virtual machine and after the logon process, using the Virtual Machine Connection, click on Action and Insert Integration Services Setup Disk.
- An AutoPlay window will open. Select Install Hyper-V Integration Components and wait until the setup finishes installing the components.
- After installing the integration components your converted virtual machine is ready to be used.
Disk2vhd also supports the command line interface, allowing you to create scripts to automate both tasks and the conversion. Simply specify the volumes you want included in a snapshot by drive letter (e.g. c:) or use "*" to include all volumes.
Usage: disk2vhd <drive: [drive:]...]|[*]> <vhdfile>
For example:
To convert a Windows 7 system installed on the C: partition into a VHD file in the E: partition, we would use the following command:
C:\> disk2vhd C: E:\Win7.vhd
To convert and include all volumes of a Windows 2008 R2 system to a VHD file on the F: drive, we would use:
C:\> disk2vhd * F:\WIN2008R2.vhd