
How to Change or Set hostname on OEL/RHEL/CentOS 7
Unlike Oracle Enterprise Linux (OEL) 6, Redhat Enterprise Linux (RHEL) 6 or CentOS 6, manually changing “HOSTNAME=xxxxx” into file /etc/sysconfig/network and restarting system simply will not work on OEL/RHEL/CentOS 7. The procedure to totally different from the previous version.
For those looking for OEL/RHEL/CentOS version 6 instructions, see my other post (How to change hostname on OEL/RHEL/CentOS version 6).
There are 4 different methods to change/set the hostname in OEL/RHEL/CentOS 7:
- The recommended method is by using the
hostnamectlcommand to control the system hostname. - Using the NetworkManager text based user interface (
nmtui) - Using the NetworkManager command-line tool (
nmcli) - Editing the
/etc/hostnamefile directly
Prior to changing the hostname, let's check the current hostname:
# hostname
schlumpf.localdomain
Method 1 : Using hostnamectl (recommended)
hostnamectl is used to change the system hostname. With this tool we can change all three classes of hostname (static, transient and pretty)
- We can also use
hostnamectlto check the current hostname:# hostnamectl status Static hostname: schlumpf.localdomain Pretty hostname: RHEL 7 Lab System Icon name: computer-vm Chassis: vm Machine ID: b7cd503ff56bf007dd3e3612482bb2aa Boot ID: 5eab5023f20640c8855a15e10cad767f Virtualization: kvm Operating System: Red Hat Enterprise Linux Server 7 CPE OS Name: cpe:/o:redhat:enterprise_linux:7:GA:server Kernel: Linux 3.10.0-693.1.1.el7.x86_64 Architecture: x86-64 - To set the new hostname, we issue the command:
hostnamectl set-hostname hostname
For example:# hostnamectl set-hostname pitufo
Note: If you use
hostnamectl, you do not need to notify the change of the hostname to the system.
Method 2 : Using nmtui
The NetworkManager tool is used to set the static hostname in /etc/hostname file.
- Start the NetworkManager text based tool by issuing the
nmtuicommand on your terminal window.# nmtui
- Select
Set system hostnamefrom within nmtui: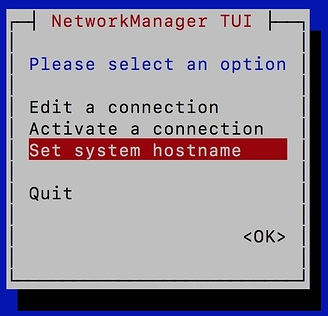
- Set the hostname to match your new FQDN hostname, and select
OK: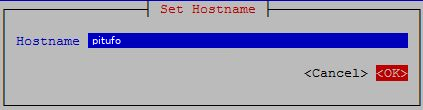
- Restart the hostnamed to force the
hostnamectlto notice the change of the static hostname:# systemctl restart systemd-hostnamed
- Verify the change on the hostname:
# hostname
pitufo
# cat /etc/hostname
pitufo
# cat /etc/sysconfig/network
# Created by anaconda
HOSTNAME=pitufo
Method 3 : Using nmcli
nmcli can be used to query and set the static hostname in /etc/hostname file.
- To check the hostname:
# nmcli general hostname
schlumpf.localdomain
- Change the hostname:
# nmcli general hostname pitufo
- Restart the
hostnamedto force thehostnamectlto notify the change of the static hostname:# systemctl restart systemd-hostnamed
Method 4 : Editing /etc/hostname
Note: This is the simplest method but does require a reboot of the server.
- View the current content:
# cat /etc/hostname
schlumpf.localdomain
- To change the hostname to
pituforeplace the content of the file/etc/hostname:# echo "pitufo" >/etc/hostname # cat /etc/hostname pitufo
- Restart the system:
# shutdown -r now
- Verify the change:
# hostname
pitufo