Configure Ubuntu 16.04 to use two-factor authentication
Two-factor authentication (2FA) is an additional layer of security that you can use on your Ubuntu 16.04 LTS server. Apart from entering the regular username and password, users connecting to your server via SSH will be required to enter a token from the Google Authenticator app.
The best way to enable 2FA authentication is through the Google Authenticator app that is available for mobile phones. This app allows you to receive a code that you should enter on your Ubuntu 18.04 alongside your username and password to prove your identity. In this guide, we will show you how you can setup 2FA and use it to help secure your Ubuntu 18.04 server against malicious hackers. We will use the Google Authenticator app available for Android (in the Play Store) and iOS (in iTunes) to generate authentication codes.
Prerequisites
- A system running Ubuntu 16.05 LTS or above (or CentOS 6/7)
- A phone running Apple iOS or Android with the Google Authenticator app available iOS (in iTunes) and Android (in the Play Store) to generate authentication codes. Other tools like Authy and FreeOTP exist if you don't want to use the Google tool.
- A configured SSH connection
Setup
- Install the Google Authenticator PAM module. On Ubuntu type:
# sudo apt-get install libpam-google-authenticator
On CentOS 6, enter:
# sudo yum install google-authenticator
and for CentOS 7, type:
# sudo dnf install google-authenticator
- Update the
/etc/pam.d/sshdfile to use the Google Authenticator module by adding the following line to the bottom of the file:auth required pam_google_authenticator.so
- Open the SSH server configuration file (
/etc/ssh/sshd_config):- Change
ChallengeResponseAuthenticationfrom no to yes:ChallengeResponseAuthentication yes
- Uncomment
PasswordAuthenticationand change it's value from yes to no:PasswordAuthentication no
- Change
UsePAMfrom no to yes:UsePAM yes
- Change
- Restart your SSH server daemon:
# sudo systemctl restart sshd
Configure Google authentication
- In a terminal, run the
google-authenticatorcommand (you should do this for all users that want 2FA on their accounts):# google-authenticator
It will ask you a series of questions, here are the recommended configuration opions:
-
Do you want authentication tokens to be time-based (y/n) y
- You will then get:
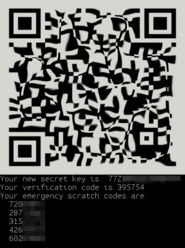
- a URL and a QR Code for the phone to setup,
- a secret key,
- a verification code
- 5 emergency scratch codes that you can use without the authenticator.
-
Do you want me to update your "/home/<user>/.google_authenticator" file (y/n) y
-
Do you want to disallow multiple uses of the same authentication
token? This restricts you to one login about every 30s, but it increases
your chances to notice or even prevent man-in-the-middle attacks (y/n) y
-
By default, tokens are good for 30 seconds and in order to compensate for
possible time-skew between the client and the server, we allow an extra
token before and after the current time. If you experience problems with poor
time synchronization, you can increase the window from its default
size of 1:30min to about 4min.  Do you want to do so? (y/n) y
-
If the computer that you are logging into isn't hardened against brute-force
login attempts, you can enable rate-limiting for the authentication module.
By default, this limits attackers to no more than 3 login attempts every 30s.
Do you want to enable rate-limiting? (y/n) y
-
- During the google-authenticator user setup process a giant QR code appeared.

You will need to scan the QR code with the Google Authenticator app. If you don't want to scan the QR code, you can enter the secret key displayed manually on the Google Authenticator app on your phone.
Note: Underneath the QR code are a set of emergency scratch codes to be used if you don't have access to your phone.. Write then down and keep them in a safe place.
Testing 2FA configuration
Open a new terminal window and log on your system. This ensures that you can easily undo the changes from the original session in case of misconfiguration:
# ssh user@system
Password:
Authentication:
During each login, you will be prompted to enter a verification code alongside your username and password. Use your Google Authenticator app to retrieve the verification code.
