
Converting VHD files to VHDX files
Converting VHD files to VHDX is quite easy, but it can take some time, based on the VHD file size. The convert wizard just asks for the VHD path of the file that needs to be converted, the disk type, and the destination path.
After completing the conversion, the virtual machine settings must be changed and the new file should be replaced.
It is important to know that everything that works on VHD works on VHDX too. Given all the benefits and improvements, there is no reason why you should not convert these disks. In case you need, for some reason, to roll back to a VHD, that is possible too. You only need to run the conversion wizard again, select the VHDX, and convert back to a VHD. With all the virtual machines running with VHDX files, you can be sure that they will give better performance and consistency.
Before you start:
- Make sure that the virtual machine is turned off.
- Copy the original VHD file to another location or run a backup to assure you will be able to recover it in case of any problems.
- Make sure that you also have enough disk space
Below are the simple steps needed to convert a VHD to a VHDX, and attach it to a virtual machine.
- In order to convert a VHD file to VHDX, open Hyper-V Manager and click on Edit Disk, on the column on the right-hand side.
- On the Before You Begin page, click on Next.
- For the Locate Virtual Hard Disk option, specify the path where your VHD file is and click on Next.
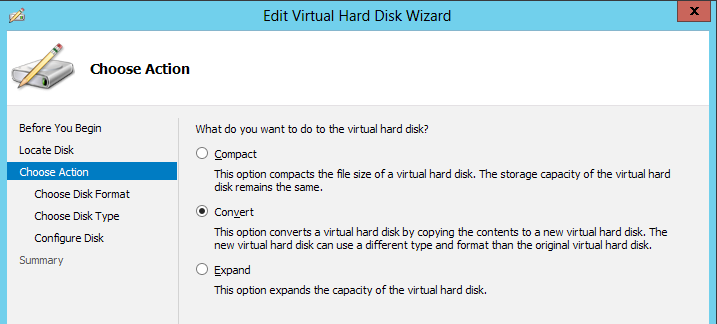
- For Choose Action, select Convert, as shown in the following screenshot, and click on Next:
- In the Convert Virtual Hard Disk window, select VHDX, and click on Next.
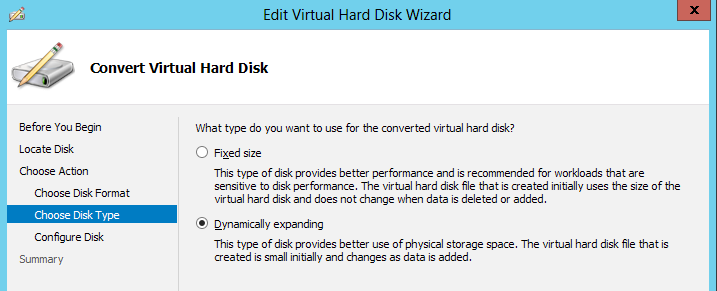
- On the next screen, select either Fixed size or Dynamically expanding as the disk type and click on Next, as shown in the following screenshot:
- For the Configure Disk option, specify the VHDX file path and click on Finish to start the conversion.
- When finished, open the virtual machine properties where the disk is attached to, select the Hard Drive option, and specify the new VHDX path. When finished, turn the virtual machine on.
For large-scale migration scenarios or in case you just need to facilitate the conversion process, you can also use the PowerShell commandlet Convert-VHD.
The only thing you need to specify is the destination VHD. For example:
C:\> Convert-VHD -Path C:\Hyper-V\Win.vhd -DestinationPath C:\Hyper-V\NewWin.vhdx