
Managing Computers Remotely with the MMC
Perhaps you work in a peer-to-peer network and need to help other users create user accounts or groups on their computers to share local folders. You can save yourself a trip to your co-workers offices by connecting to the users computers with your Com� puter Management console (as shown in Figure 1). Or perhaps you need to format drives or perform other tasks on a remote computer. You can perform almost any task on a remote computer that you can perform locally.
Setting Up the Snap-In for Remote Use
To connect to and manage another system using the Computer Management console, you must launch the console with an account that has administrative credentials on the remote computer. If your credentials do not have elevated privileges on the target com� puter, you will be able to load the snap-in, but will not be able to read information from the target computer.
Tip You can use Run As, or secondary logon, to launch a console with credentials other than those with which you are currently logged on.
When you're ready to manage the remote system, you may open an existing console with the snap-in loaded, or configure a new MMC with a snap-in that you configure for remote connection when you build the console. If you configure an existing Computer Management console, for example, follow these steps:
- Open the Computer Management console by right-clicking My Computer and choosing Manage from the shortcut menu.
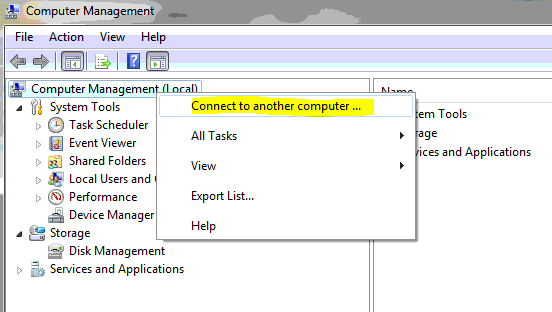
- Right-click Computer Management in the tree pane and choose Connect To Another Computer.
- In the dialog box shown in Figure 2, type the name or IP address of the com� puter or browse the network for it, and then click OK to connect.
Once connected, you can perform administrative tasks on the remote computer.
Adding a Remote Computer for Management (Optional)
Note This practical example requires that you have a computer available for remote connection, and that you have administrative privileges on that computer.
In this exercise, you will modify an existing MMC to connect to a remote computer.
- Open the saved MMC from the exercise in Lesson 1 (MyEvents).
- From the File menu, click Add/Remove Snap-In.
- In the Add/Remove Snap-In dialog box, click Add to display the Add Standalone Snap-In dialog box.
- Locate the Computer Management snap-in, and then click Add.
- In the Computer Management dialog box, select Another Computer.
- Type the name or IP address of the computer, or browse the network for it, and then click Finish to connect.
- Click Close in the Add Standalone Snap-In dialog box, then click OK to load the Computer Management snap-in to your MyEvents console. You can now use the management tools to administer the remote computer.
Summary
The MMC is able to load many different tools in the form of snap-ins. Some of these snap-ins are programmed with the ability to connect either to the local computer or to remote computers. The connection to a remote computer can be established when the snap-in is loaded, or after loading by right-clicking the snap-in and choosing Connect. You must have administrative privileges on the remote computer to use any tools affecting the configuration of the remote computer.