
Installing a Windows Server 2003
As an experienced IT professional, you have no doubt spent considerable time install�ing Windows platforms.
Some of the important and enhanced considerations when installing Windows Server 2003 are:- Bootable CD-ROM installation Most administrators first became accustomed to installing an operating system by booting from the CD-ROM in the late 1990s. Windows Server 2003 continues the trend, and can be installed directly from the CD-ROM. But Windows Server 2003 adds a twist: there is no support for starting installation from floppy disks.
- Improved graphical user interface (GUI) during setup Windows Server 2003 uses a GUI during setup that resembles that of Windows XP. It communicates more clearly the current state of the installation and the amount of time required to complete installation.
- Product activation Retail and evaluation versions of Windows Server 2003 require that you activate the product. Volume licensing programs, such as Open License, Select License, or Enterprise Agreement, do not require activation.
After installing and activating Windows, you can configure the server using a well- thought-out Manage Your Server page, as shown in Figure 1, that launches automat� ically at logon. The page facilitates the installation of specific services, tools, and configurations based on server roles. Click Add Or Remove A Role and the Configure Your Server Wizard appears.
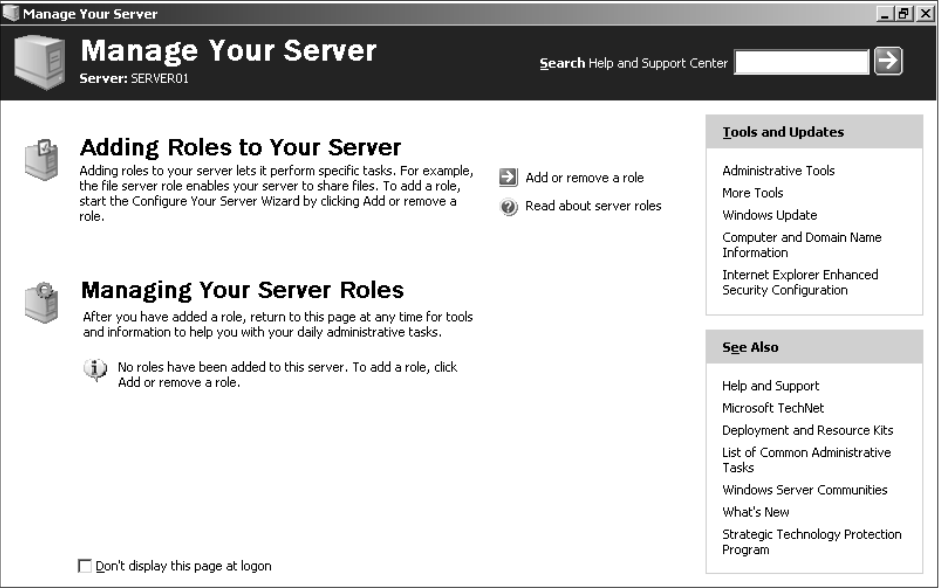
If you select Typical Configuration For A First Server, the Configure Your Server Wizard promotes the server to a domain controller in a new domain, installs Active Directory services, and, if needed, Domain Name Service (DNS), Dynamic Host Configuration Protocol (DHCP), and Routing And Remote Access (RRAS) service.
If you select Custom Configuration, the Configure Your Server Wizard can configure the following roles:
- File Server Provides convenient, centralized access to files and directories for individual users, departments, and entire organizations. Choosing this option allows you to manage user disk space by enabling and configuring disk quota management and to provide improved file system search performance by enabling the Indexing service.
- Print Server Provides centralized and managed access to printing devices by serving shared printers and printer drivers to client computers. Choosing this option starts the Add Printer Wizard to install printers and their associated Windows printer drivers. It also installs Internet Information Services (IIS 6.0) and configures Internet Printing Protocol (IPP) and installs the Web-based printer administration tools.
- Application Server (IIS, ASP.NET) Provides infrastructure components required to support the hosting of Web applications. This role installs and config� ures IIS 6.0 as well as ASP.NET and COM+.
- Mail Server (POP3, SMTP) Installs POP3 and SMTP so that the server can act as an e-mail server for POP3 clients.
- Terminal Server Provides applications and server resources, such as printers and storage, to multiple users as if those applications and resources were installed on their own computers. Users connect with the Terminal Services or Remote Desktop clients. Unlike Windows 2000, Windows Server 2003 provides Remote Desktop for Administration automatically. Terminal Server roles are required only when hosting applications for users on a terminal server.
- Remote Access/VPN Server Provides multiple-protocol routing and remote access services for dial-in, local area networks (LANs) and wide area networks (WANs). Virtual private network (VPN) connections allow remote sites and users to connect securely to the network using standard Internet connections.
- Domain Controller (Active Directory) Provides directory services to clients in the network. This option configures a domain controller for a new or existing domain and installs DNS. Choosing this option runs the Active Directory Installa� tion Wizard.
- DNS Server Provides host name resolution by translating host names to IP addresses (forward lookups) and IP addresses to host names (reverse lookups). Choosing this option installs the DNS service, and then starts the Configure A DNS Server Wizard.
- DHCP Server Provides automatic IP addressing services to clients configured to use dynamic IP addressing. Choosing this option installs DHCP services and then starts the New Scope Wizard to define one or more IP address scopes in the network.
- Streaming Media Server Provides Windows Media Services (WMS). WMS enables the server to stream multimedia content over an intranet or the Internet. Content can be stored and delivered on demand or delivered in real time. Choos� ing this option installs WMS.
- WINS Server Provides computer name resolution by translating NetBIOS names to IP addresses. It is not necessary to install Windows Internet Name Service (WINS) unless you are supporting legacy operating systems, such as Windows 95 or Windows NT. Operating systems such as Windows 2000 and Windows XP do not require WINS, although legacy applications on those platforms may very well require NetBIOS name resolution. Choosing this option installs WINS.
Installation Procedure
To complete the hands-on exercise, this article provides the steps needed to configure a computer to run Windows Server 2003. We will configure a computer as Server01.
Note: This exercise should be performed on a computer compatible with Windows Server 2003. It assumes that the primary hard drive is completely empty. If your disk already has partitions configured, you can modify the exercise to match the configuration of your system.
- Configure the computer's BIOS or the disk controller BIOS to boot from CD-ROM. If you are not sure how to configure your computer or disk controller to boot from CD-ROM, consult your hardware documentation.
- Insert the Windows Server 2003 installation CD-ROM into the CD-ROM drive and restart the computer.
- If the primary disk is not empty, a message appears prompting you to press any key to boot from CD. If you see this message, press any key. After the computer starts, a brief message appears explaining that your system configuration is being inspected, and then the Windows Setup screen appears.
- If your computer requires special mass storage drivers that are not part of the Windows Server 2003 driver set, press F6 when prompted and provide the appropriate drivers.
- The system prompts you to press F2 to perform an Automated System Recovery (ASR). Automated System Recovery is a new feature in Windows Server 2003 that replaces the Emergency Repair Disk feature of previous versions of Windows, and is described in Chapter 13. Do not press F2 at this time. Setup will continue. Notice that the gray status bar at the bottom of the screen indicates that the com�puter is being inspected and that files are loading. This is required to start a min�imal version of the operating system.
- If you are installing an evaluation version of Windows Server 2003, the Setup Noti� fication screen appears informing you of this. Read the Setup Notification mes� sage, and then press Enter to continue. Setup displays the Welcome To Setup screen. Notice that, in addition to the initial installation of the operating system, you can use Windows Server 2003 Setup to repair a damaged Windows installation. (You can review my other article The Recovery Console for details).
- Read the Welcome To Setup message, and then press Enter to continue. Setup dis� plays the License Agreement screen.
- Read the license agreement, pressing Page Down to scroll to the bottom of the screen.
- Press F8 to accept the agreement. Setup displays the Windows Server 2003 Setup screen, prompting you to select an area of free space or an existing partition on which to install the operating system. This stage of setup provides a way for you to create and delete partitions on your hard disk. To complete this example you will need to configure a partition large enough to host the operating system installation (recommended minimum size is 3 GB) and unallocated space of at least 1 GB. The following steps assume your disk is at least 4 GB in size and is currently empty. You may make adjustments to accommodate your situation.
- Press C to create a partition.
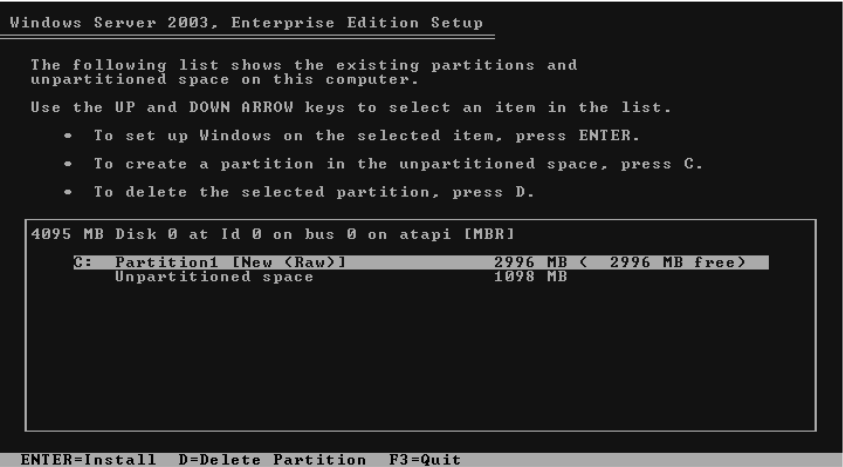
- To create a 3 GB partition type 3072 in the Create Partition Of Size (In MB) box and press Enter.
- Confirm that your partitioning is similar to that shown in Figure 2. Again, the recommendations for the hands-on exercises is a C: partition of at least 3 GB and 1 GB of unpartitioned space.
- Select C: Partition1 [New (Raw)] and press Enter to install. You are prompted to select a file system for the partition.
- Verify that the Format The Partition Using The NTFS File System option is selected, and press Enter to continue. Setup formats the partition with NTFS, examines the hard disk for physical errors that might cause the installation to fail, copies files to the hard disk, and initializes the installation. This process takes several minutes. Eventually, Setup displays a red status bar that counts down for 15 seconds before the computer restarts and enters the GUI mode of the setup process.
- After the text mode of setup has completed, the system restarts. Do not, when prompted, press a key to boot to the CD-ROM. Windows Setup launches and produces a graphical user interface that tracks the progress of installation in the left pane. Collecting Information, Dynamic Update, and Preparing Installation options are selected. Collecting Information was com� pleted before the GUI appeared, and Dynamic Update is not used when starting from the CD-ROM. The system is now Preparing Installation by copying files to the local disk drive.
- On the Regional And Language Options page, choose settings that are appropriate for your language and text input requirements, and then click Next.
Tip You can modify regional settings after you install the operating system using Regional And Language Options in Control Panel.
Setup displays the Personalize Your Software page, prompting you for your name and organization name. - In the Name text box, type your name; in the Organization text box, type the name of an organization, and then click Next. Setup displays the Your Product Key page.
- Enter the product key included with your Windows Server 2003 installation CD- ROM, and then click Next. Setup displays the Licensing Modes dialog box, prompting you to select a licens�ing mode.
- Verify that the Per Server Number Of Concurrent Connections option is 5, and then click Next.
Important Per Server Number Of Concurrent Connections and 5 concurrent connections are suggested values to be used to complete your self-study. You should use a legal number of concurrent connections based on the actual licenses that you own. You can also choose to use Per Device Or Per User option instead of Per Server.
Setup displays the Computer Name And Administrator Password page. Notice that Setup uses your organization name to generate a suggested name for the computer. If you didn't enter an organization name earlier in the installation process, Setup uses your name to generate part of the computer name. - In the Computer Name text box, type Server01.
The computer name displays in all capital letters regardless of how it is entered. Throughout the rest of this self-paced training kit, the practices refer to Server01.
Caution If your computer is on a network, check with the network administrator before assigning a name to your computer.
- In the Administrator Password text box and the Confirm Password text box, type a complex password for the Administrator account (one that others cannot easily guess). Remember this password because you will be logging on as Administrator to perform most hands-on exercises.
Important In a manual installation, Windows Server 2003 will not let you progress to subsequent steps until you enter an Administrator password that meets complexity require�ments. You are allowed to enter a blank password, though this practice is strongly discouraged.
If the server has a modem installed, you will be presented with the Modem Dialing Information dialog box. - Type your area code, and then click Next. The Date And Time Settings page appears.
- Type the correct Date & Time and Time Zone settings, and then click Next.
Important Windows Server 2003 services depend on the computer's time and date settings. Be sure to enter the correct time and date, and to select the correct time zone for your location.
- On the Networking Settings page, select Typical Settings, and then click Next. The Workgroup Or Computer Domain page appears.
- Verify that the first option is selected and that the workgroup name is Workgroup, and then click Next. Setup installs and configures the remaining operating system components. Whenthe installation is complete, the computer restarts automatically and the Welcome To Windows dialog box appears.
- Press Ctrl+Alt+Delete to initiate logon, and type the password you configured for the Administrator account.
Note Some editions of Windows Server 2003 require that you activate the operating system after you install it. Activation must occur within 14 days of installation. The activation process is simple and can be com�pleted over the Internet or by telephone. If you acquire your license to use Windows Server 2003 through one of the Microsoft volume licensing programs, you are not required to activate the license.
- Click the balloon that appears in the System tray to initiate activation of Windows Server 2003. Follow the on-screen prompts.
Note To activate by Internet, you will have to connect Server01 to the network and you may have to adjust the TCP/IP properties of your network interface card (NIC) to reflect an appro�priate IP address, subnet mask, default gateway, and DNS server address.